Quoi de neuf 2017
From Eric
(Difference between revisions)
m |
|||
| Line 7: | Line 7: | ||
* [[Quoi de neuf 2012 | 2012]] | * [[Quoi de neuf 2012 | 2012]] | ||
* [[Quoi de neuf 2011 | 2011]] | * [[Quoi de neuf 2011 | 2011]] | ||
| + | == December 2017 == | ||
| + | * Nothing | ||
| + | == November 2017 == | ||
| + | * Nothing | ||
| + | == October 2017 == | ||
| + | * Nothing | ||
| + | == September 2017 == | ||
| + | * Nothing (CAPHCA project @ IRT) | ||
| + | == August 2017 == | ||
| + | * 15/08/2017 | ||
| + | ** Painful investigations about RTOS on the Raspberry Pi. Tried Xenomai, FreeRTOS and RTEMS. Nothing runs really "out of the box". Some notes (in french) are available [https://1drv.ms/w/s!AuATPoIeeSgFk8hsuDnJoW0mOKhXcA here]. | ||
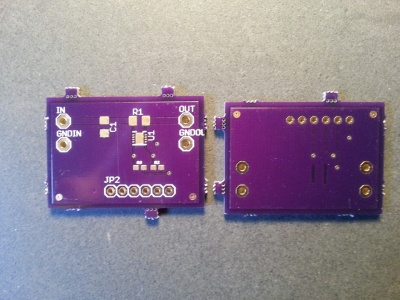
| + | ** I have received the PCB for the LT2944 breakout board from OSH Park: [[File:ltc2944_osh.jpg|400px|thumb|none]] | ||
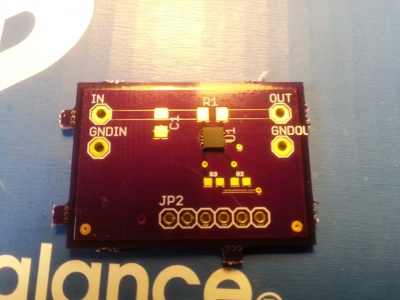
| + | ** I have managed to solder the tiny LTC2944 without a stencil: a magnifier, a pair of twizers with extremely thin ends and that's it. The games consists to push the soldering paste on the tracks "manually" and removing what is between adjacent tracks. (Things would be much easier with a stencil, but unfortunately, I don't have one.) Once the paste is at the appropriate place, I use a hot air soldering gun. The result is just fine. (By the way, don't clean a Osh park PCB with standard alcohol (not isopropyl) because it dissolve the nice purple vernish. | ||
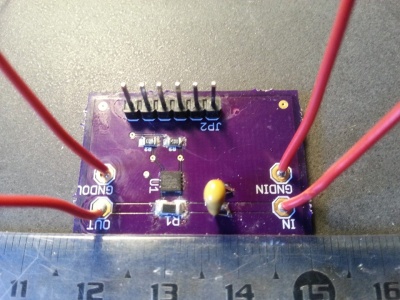
| + | ** Here is the result: [[File:ltc2944_soldered_board_1.jpg|400px|thumb|none]] [[File:ltc2944_soldered_board_2.jpg|400px|thumb|none]] | ||
| + | == July 2017 == | ||
| + | * 30/07/2017 | ||
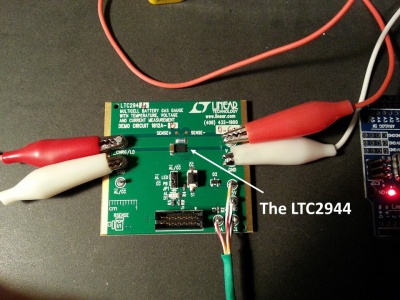
| + | ** Playing with the [http://www.linear.com/product/LTC2944 LTC2944] Coulomb counter from Linear Technology. This chip is used as a "fuel gauge" for battery-powered equipments. Here is a picture of the thing: [[File:lptc2944.jpg|400px|thumb|none]][[File:ltc2944_closer.jpg|400px|thumb|none]]Pretty small, isn't it?[[File:ltc2944_all.jpg|400px|thumb|none]] | ||
| + | ** I have "designed" a small PCB to make it easier to play with it (currently, I am using LT demonstration board connected to an Arduino). I should receive the actual PCB (from Osh Park) soon: [[File:ltc2944_pcb.jpg|400px|thumb|none]][[File:ltc2944_board.jpg|400px|thumb|none]][[File:ltc2944_schem.jpg|400px|thumb|none]] | ||
| + | ** The Arduino code can be found [https://1drv.ms/u/s!AuATPoIeeSgFk8gHkd4L14HUNdgEvA here], and the Python script to display the sensors' values can be found [https://1drv.ms/u/s!AuATPoIeeSgFk8gGJTHE8eNDfKRE4Q here]. | ||
| + | * 15/07/2017 | ||
| + | ** I have built an ESR meter. The design comes from Jay_Diddy_B, see [http://www.eevblog.com/forum/projects/5-transistor-esr-meter-design/ 5 transistor ESR meter design]. Explanations are given in [https://www.youtube.com/watch?v=3fiUZZlveS0 W2AEW blog] (excellent video as usual, higly recommended blog)[[File:5trans_esr.jpg|800px|thumb|none]] | ||
| + | * 14/07/2017 | ||
| + | ** I have installed a bunch of NeoPixels (WS1812) in one of these old optic fiber lamps. To drive the pixels, I have simply used an Arduino pro mini with the AdaFruit NeoPixel library. The result is pretty nice. [[File:victorlight.jpg|400px|thumb|none]] | ||
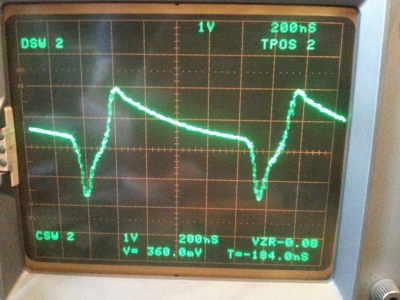
| + | ** I have built a Joule thief (a LED, a 2N2222 and a toroid self). [[File:joulethiefschema.jpg|400px|thumb|none]][[File:joulethief.jpg|400px|thumb|none]][[File:joulethiefsignal.jpg|400px|thumb|none]] | ||
| + | * 02/07/2017 | ||
| + | ** I have bought a small 3D printer, the [http://www.trinus3d.com/ Trinus3D]: [[File:trinus.jpg|400px|thumb|none]] | ||
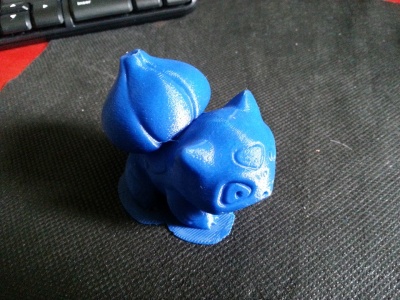
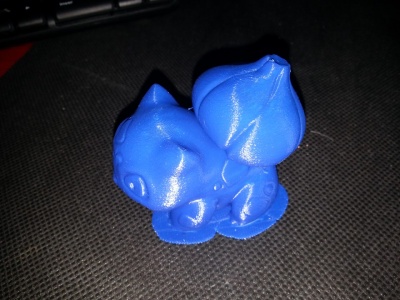
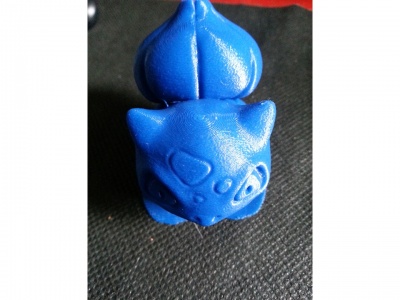
| + | ** I have printed the small Bulbasaur that was pre-loaded on the SD card: [[File:bbs1.jpg|400px|thumb|none]][[File:bbs2.jpg|400px|thumb|none]][[File:bbs3.jpg|400px|thumb|none]] | ||
| + | == June 2017 == | ||
| + | * 25/06/2017 | ||
| + | ** I have tried my little thermal printer : [[File:goojprt.jpg|400px|thumb|none]] | ||
| + | ** I have used the [https://github.com/adafruit/Adafruit-Thermal-Printer-Library library developed by Adafruit] to print bar codes, and the [https://github.com/grintor/QRprint library] developed by grintor to print QR-Code. I read the QR codes with my mobile phone using [https://play.google.com/store/apps/details?id=com.application_4u.qrcode.barcode.scanner.reader.flashlight Lightning scanning QR]. Works pretty well. The printer user manual can be found [http://tronixstuff.com/wp-content/uploads/2011/07/a2-user-manual-1.pdf here]. | ||
| + | ** To generate and print QR-codes on my PC, I use [https://www.tec-it.com/en/download/free-software/qrcode-studio/Download.aspx QR Code studio]. | ||
| + | |||
| + | * 24/06/2017 | ||
| + | ** I have managed to use the fantastic DWM1000 chip: [[File:dw1000m.jpg|200px|thumb|none]] | ||
| + | ** [Edit 14/07] Did I write "fantastic?"? Well, it seems that I have destroyed one or two (or three?) of these tiny beasts. Curiously, only the DWM playing the role of TAGs seem to fail... Investigations are ongoing.] | ||
| + | ** This chip, manufactured by [https://www.decawave.com/products/dwm1000-module Decawave] can be used for in-door localization. It is based on the measurement of the time of flight of radio waves. | ||
| + | ** I have used small Arduino pro mini at 3.3V to drive the chips. Hopefully, all the dirty work has been done by Thotro who provides a nice librabry, see [https://github.com/thotro/arduino-dw1000/wiki/Testbed-and-Adapter-board here] and [https://github.com/thotro/arduino-dw1000 there], on GitHub. | ||
| + | ** To solder the chip, I use a [https://oshpark.com/shared_projects/UvijZHUf breakout board] designed by [https://sites.google.com/site/wayneholder/uwb-ranging-with-the-decawave-dwm1000 Wayne] and manufactured on demand by [https://oshpark.com/shared_projects/UvijZHUf OSH park]. | ||
| + | ** One VERY important thing to now: the power supply must be strong enough to support the peak current demands of the DWM1000. If the power supply is too weak, it will work very erratically. By the way, if you use one of those small breadboard power supply, do not forget to add a LARGE CAPACITOR (see the pictures). | ||
| + | ** Up to now, I only use the existing library which gives me 3 distances. Now, I have to implement some smart trilateration algorithm. | ||
| + | ** Here is a picture of the 3 "anchors" and the tag: | ||
| + | [[File:dw1000m_3a_1t.jpg|400px|thumb|none]] | ||
| + | [[File:dw1000m_1t.jpg|400px|thumb|none]] | ||
| + | |||
| + | |||
| + | == May 2017 == | ||
| + | Nada. | ||
| + | |||
| + | == April 2017 == | ||
| + | Nothing. | ||
| + | |||
| + | == March 2017 == | ||
| + | Void. | ||
| + | |||
| + | == February 2017 == | ||
| + | Empty set. | ||
| + | |||
| + | == January 2017 == | ||
| + | Null. | ||
Revision as of 15:57, 7 January 2018
Experiments carried out in the past (from 2011) are described hereafter:
Contents |
December 2017
- Nothing
November 2017
- Nothing
October 2017
- Nothing
September 2017
- Nothing (CAPHCA project @ IRT)
August 2017
- 15/08/2017
- Painful investigations about RTOS on the Raspberry Pi. Tried Xenomai, FreeRTOS and RTEMS. Nothing runs really "out of the box". Some notes (in french) are available here.
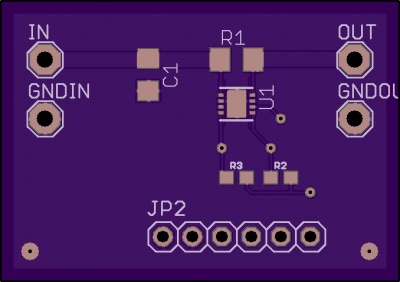
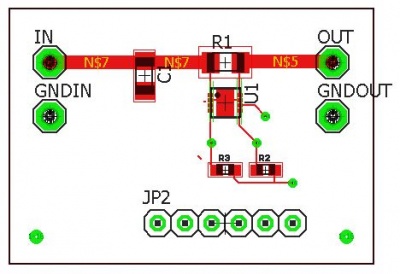
- I have received the PCB for the LT2944 breakout board from OSH Park:

- I have managed to solder the tiny LTC2944 without a stencil: a magnifier, a pair of twizers with extremely thin ends and that's it. The games consists to push the soldering paste on the tracks "manually" and removing what is between adjacent tracks. (Things would be much easier with a stencil, but unfortunately, I don't have one.) Once the paste is at the appropriate place, I use a hot air soldering gun. The result is just fine. (By the way, don't clean a Osh park PCB with standard alcohol (not isopropyl) because it dissolve the nice purple vernish.
- Here is the result:


July 2017
- 30/07/2017
- Playing with the LTC2944 Coulomb counter from Linear Technology. This chip is used as a "fuel gauge" for battery-powered equipments. Here is a picture of the thing:
 Pretty small, isn't it?
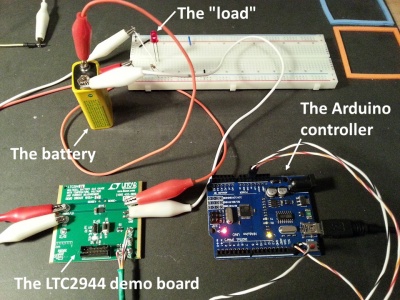
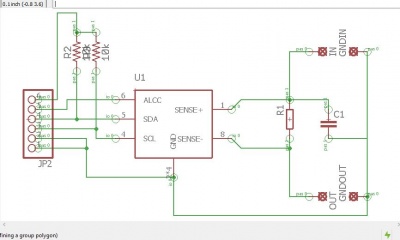
- I have "designed" a small PCB to make it easier to play with it (currently, I am using LT demonstration board connected to an Arduino). I should receive the actual PCB (from Osh Park) soon:
- The Arduino code can be found here, and the Python script to display the sensors' values can be found here.
- Playing with the LTC2944 Coulomb counter from Linear Technology. This chip is used as a "fuel gauge" for battery-powered equipments. Here is a picture of the thing:
- 15/07/2017
- I have built an ESR meter. The design comes from Jay_Diddy_B, see 5 transistor ESR meter design. Explanations are given in W2AEW blog (excellent video as usual, higly recommended blog)
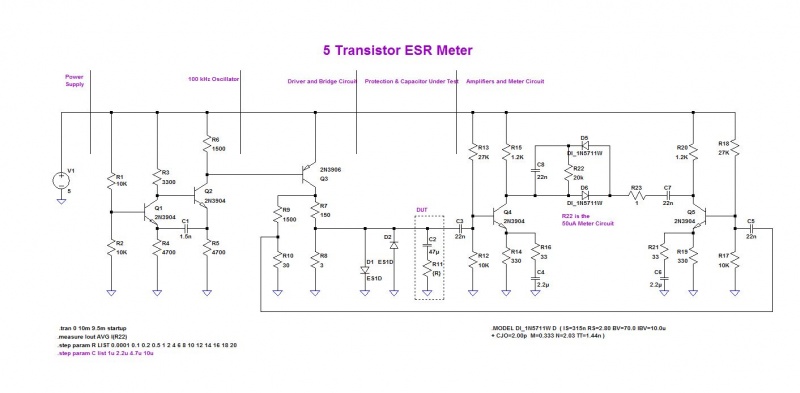
- I have built an ESR meter. The design comes from Jay_Diddy_B, see 5 transistor ESR meter design. Explanations are given in W2AEW blog (excellent video as usual, higly recommended blog)
- 14/07/2017
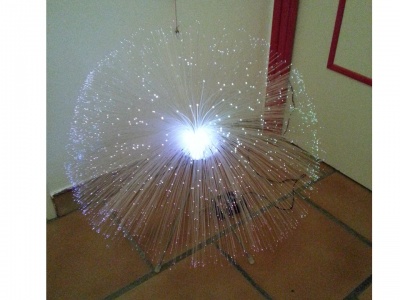
- I have installed a bunch of NeoPixels (WS1812) in one of these old optic fiber lamps. To drive the pixels, I have simply used an Arduino pro mini with the AdaFruit NeoPixel library. The result is pretty nice.
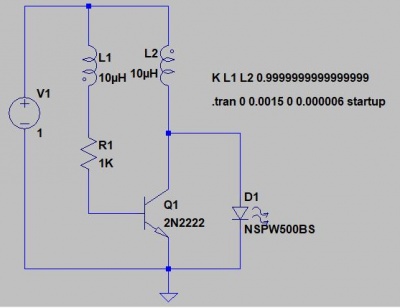
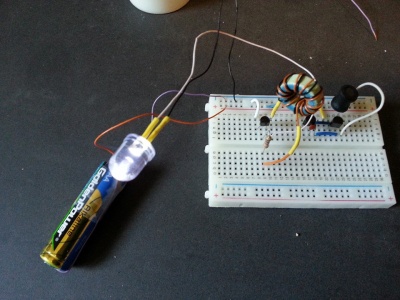
- I have built a Joule thief (a LED, a 2N2222 and a toroid self).
- I have installed a bunch of NeoPixels (WS1812) in one of these old optic fiber lamps. To drive the pixels, I have simply used an Arduino pro mini with the AdaFruit NeoPixel library. The result is pretty nice.
- 02/07/2017
- I have bought a small 3D printer, the Trinus3D:

- I have printed the small Bulbasaur that was pre-loaded on the SD card:
- I have bought a small 3D printer, the Trinus3D:


June 2017
- 25/06/2017
- I have tried my little thermal printer :
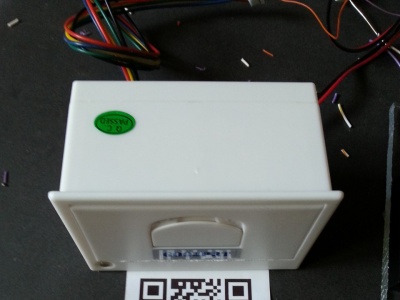
- I have used the library developed by Adafruit to print bar codes, and the library developed by grintor to print QR-Code. I read the QR codes with my mobile phone using Lightning scanning QR. Works pretty well. The printer user manual can be found here.
- To generate and print QR-codes on my PC, I use QR Code studio.
- I have tried my little thermal printer :

- 24/06/2017
- I have managed to use the fantastic DWM1000 chip:
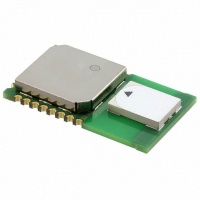
- [Edit 14/07] Did I write "fantastic?"? Well, it seems that I have destroyed one or two (or three?) of these tiny beasts. Curiously, only the DWM playing the role of TAGs seem to fail... Investigations are ongoing.]
- This chip, manufactured by Decawave can be used for in-door localization. It is based on the measurement of the time of flight of radio waves.
- I have used small Arduino pro mini at 3.3V to drive the chips. Hopefully, all the dirty work has been done by Thotro who provides a nice librabry, see here and there, on GitHub.
- To solder the chip, I use a breakout board designed by Wayne and manufactured on demand by OSH park.
- One VERY important thing to now: the power supply must be strong enough to support the peak current demands of the DWM1000. If the power supply is too weak, it will work very erratically. By the way, if you use one of those small breadboard power supply, do not forget to add a LARGE CAPACITOR (see the pictures).
- Up to now, I only use the existing library which gives me 3 distances. Now, I have to implement some smart trilateration algorithm.
- Here is a picture of the 3 "anchors" and the tag:
- I have managed to use the fantastic DWM1000 chip:


May 2017
Nada.
April 2017
Nothing.
March 2017
Void.
February 2017
Empty set.
January 2017
Null.